Building a Serverless Website on AWS - Part 1
As a first project on my way to Cloud learning, I've come across the cloudresumechallenge. While many people have tried and succeeded, this will be my version on how I did it. While the steps to complete the challenge are straightforward, some of them took longer due to my lack of hands-on experience using cloud services.
The project is split into 4 parts:
I would highly recommend a few tools to setup the workspace before starting the project. A code editor (Visual Studio Code), repository to store the code (Github) would be an ideal start.
Part One: Hosting the Website using Cloudfront
Step 1: Website design
The start of the project was to design a user facing website, which requires one or more webpages designed in html. A basic website using plain html is quite uncommon in today's world as it doesn't look great or accomplish any functionality (sample here). A typical website is designed using CSS which helps format the layout, content, colours, fonts etc, and scripts(Javascript, Perl, PHP etc.) which makes the webpages dynamic and interactive. Fortunately, there are website templates that can be found everywhere on the internet, which can be customized to our requirement.

The picture above shows my current website design using an open-source template from HTML5 UP. The template package comes with the webpages along with required CSS and Javascript files. The
source files can be found at Github. Any
suggestions or feedback with the design is always welcome (Use the "Get In Touch" section of the website).
Step 2: Domain
The simplest way to host a website is to use Static hosting from S3 which can be enabled from the properties menu under the bucket settings. Upload all the files into the bucket and use the url link generated by 'static website hosting' setting. A tutorial can be found at AWS Website. This way of hosting makes use of the url generated by S3 which looks like http://BUCKETNAME.s3-website.eu-north-1.amazonaws.com, which is definitely not a good one to share.
Since the challenge was to use custom domain, I've registered a domain name oncloud9.net using AWS Route53 (domains from other providers can be imported to Route53 if needed) as its easy to integrate with other AWS services. Route53 creates the NS and A records automatically and the domain will become active in no time.
Create an S3 bucket with the same name as the domain name 'oncloud9.net' (without the www prefix) and upload all the website files into the bucket. The prefix doesn't really
matter as you'll end up creating a second bucket with the prefix which will act as a redirect to the main bucket. This is required to provide the convinience of being able to
reach the website irrespective of the www prefix. The ideal way of placing the website files in the bucket is to keep the index.html file at the root of the bucket.
Note: It's important that the bucket name should match the domain name that will be used for the website.
Step 3: Cloudfront
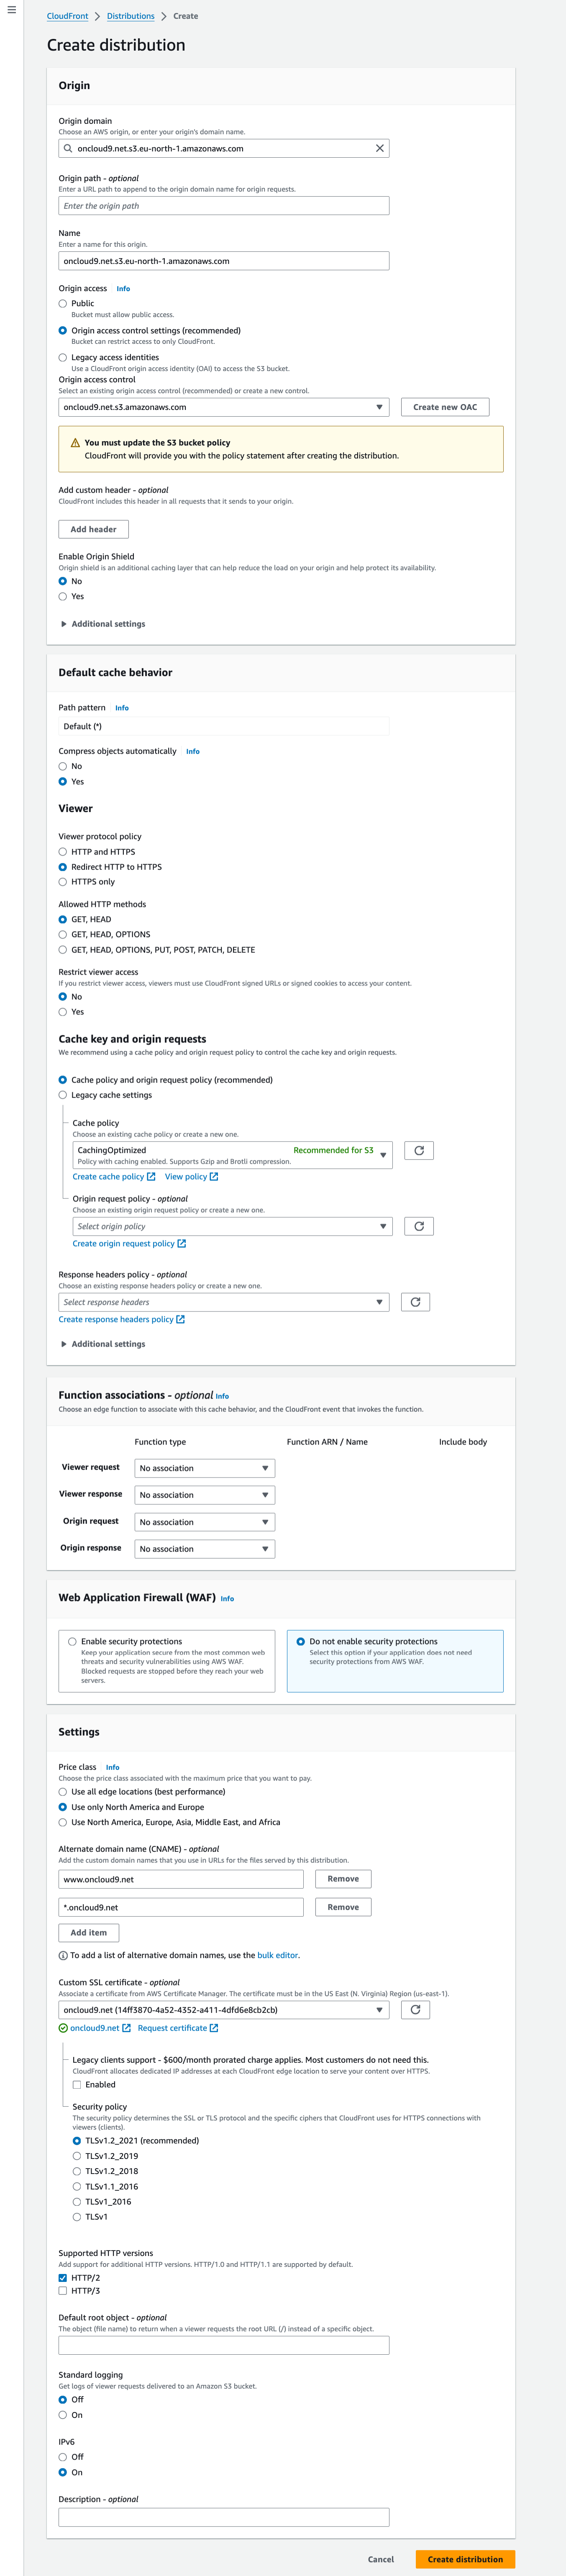
A step-by-step help article to complete this section can be found here. While the article is helpful, I had to make a few changes to my deployement which will be detailed below.
The key features of the Cloudfront distribution for this project are the origin domain (S3 bucket), origin access (Create new OAC), Viewer protocol policy (HTTP to HTTPS), price class (according to the requirement), SSL certificate (Request a certificate). Rest of them can be left with their default setting.
The idea was to improve the security of the web traffic by forcing the users to use HTTPS protocol. Cloudfront requires a security certificate to encrypt the connections between Cloudfront distribution and the viewers. AWS Certificate manager helps with generating a public certificate at no cost. The certificate needs to be verified by adding a CNAME record to the Route53 DNS records.
The website should be reachable both at oncloud9.net and also at www.oncloud9.net which requires two Cloudfront distributions. Each cloudfront distribution uses an S3 bucket to show the website contents directly or to redirect to the main S3 bucket. Hence we need to create a second bucket with the domain name with the www prefix www.oncloud9.net. While this is true according to the help article, I was able to use a single Cloudfront distribution to serve the website at both cloud9.net & www.oncloud9.net by using the alternate domain names feature while settingup the Cloudfront. A CNAME record will be added to the Route53 records that points to the website.
Another important aspect of setting up the Cloudfront distribution is Origin Access Control (OAC) which controls the access to the S3 bucket only by the cloudfront distribution, and not from the outside. A supporting bucket policy will be generated automatically during the Cloudfront distribution creation stage which needs to be pasted in the s3 bucket settings.
Now is the time to test the deployment. The website should be accessible by calling the domain name with or witout the 'www' prefix.